一、安装
1.1 apt 方式安装
1
2
3
4
5
| # 验证仓库版本
apt-cache madison containerd
# 安装 containerd
apt install containerd=1.6.12-0ubuntu1~22.04.1
|
生成 containerd 配置文件
1
2
3
4
5
6
| root@k8s-node02:~# mkdir -p /etc/containerd/
root@k8s-node02:~# containerd config default > /etc/containerd/config.toml
root@k8s-node02:~# ll /etc/containerd/config.toml
-rw-r--r-- 1 root root 6994 Apr 9 13:36 /etc/containerd/config.toml
|
启动 containerd
1
| systemctl enable --now containerd
|
通过命令行测试下载镜像
containerd的命令⾏客户端有ctr、crictl、nerdctl等,containerd相⽐docker多了⼀个命名空间的逻辑概念,⾃身的命令⾏客户端ctr命令默认是在default命名空间⾥、nerdctl也是在default,当使⽤crictl命令的时候,是在k8s.io这个命名空间,⽽k8s的创建的pod也是在k8s.io命名空间,因此在使⽤nerdctl管理kubernetes环境的pod的时候要指定命名空间为k8s.io,否则看不到kubernetes环境中的pod

验证镜像
ctr 客户端创建测试容器
1
2
3
| ctr run -t --net-host docker.io/library/alpine:latest testcontainer sh
ctr containers ls
|
1.2 二进制方式安装
下载、解压二进制包
1
2
3
| wget https://github.com/containerd/containerd/releases/download/v1.6.20/containerd-1.6.20-linux-amd64.tar.gz
tar zxvf containerd-1.6.20-linux-amd64.tar.gz -C /usr/local/
|
创建启动脚本
vim /usr/lib/systemd/system/containerd.service
 1
 2
 3
 4
 5
 6
 7
 8
 9
10
11
12
13
14
15
16
17
18
19
20
21
22
23
24
25
26
| [Unit]
Description=containerd container runtime
Documentation=https://containerd.io
After=network.target local-fs.target
[Service]
ExecStartPre=-/sbin/modprobe overlay
ExecStart=/usr/local/bin/containerd
Type=notify
Delegate=yes
KillMode=process
Restart=always
RestartSec=5
# Having non-zero Limit*s causes performance problems due to accounting overhead
# in the kernel. We recommend using cgroups to do container-local accounting.
LimitNPROC=infinity
LimitCORE=infinity
LimitNOFILE=infinity
# Comment TasksMax if your systemd version does not supports it.
# Only systemd 226 and above support this version.
TasksMax=infinity
OOMScoreAdjust=-999
[Install]
WantedBy=multi-user.target
|
生成配置文件
1
2
3
4
| root@k8s-node03:~# mkdir -p /etc/containerd/
root@k8s-node03:~# containerd config default > /etc/containerd/config.toml
root@k8s-node03:~# ll /etc/containerd/config.toml
-rw-r--r-- 1 root root 6994 Apr 9 14:08 /etc/containerd/config.toml
|
提示:containerd的配置文件默认是/etc/containerd/config.toml;我们可以通containerd --help|grep config命令得到该信息
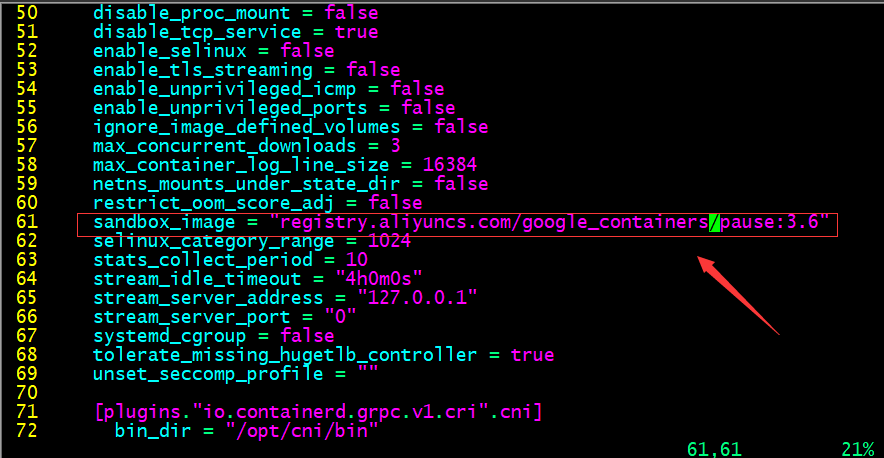
编辑配置文件,配置底层 pause 镜像地址
提示:默认pause镜像地址是registry.k8s.io/pause:3.6,该仓库在google,一般需要借助科学上问工具才能正常访问,所以这里我们换成国内的镜像地址
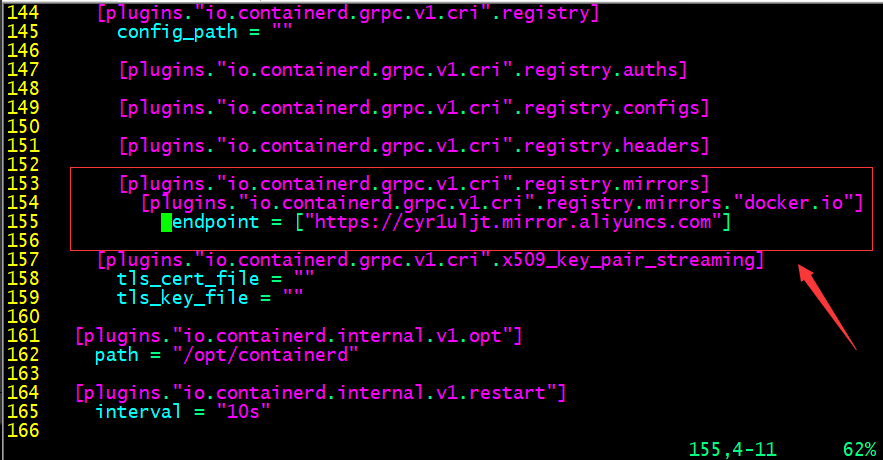
配置镜像加速器
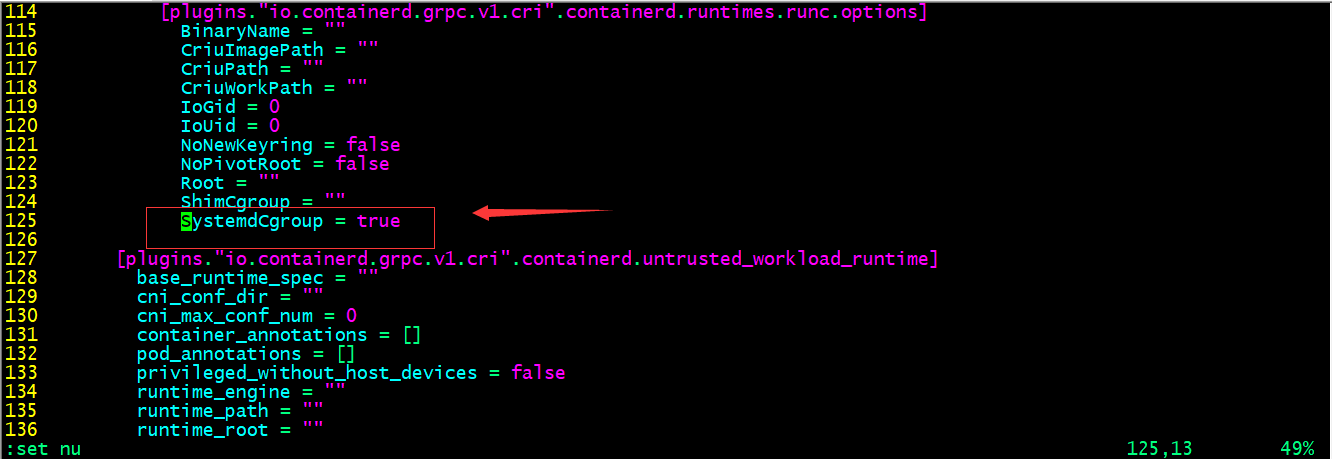
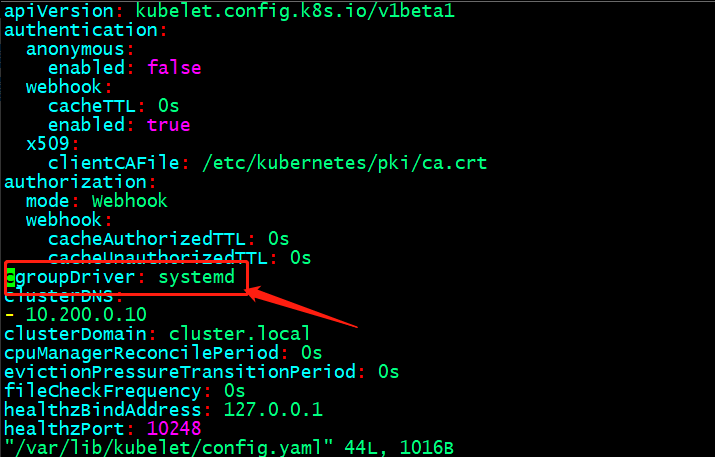
配置 systemd 驱动器
提示:cgroup是用来对容器的资源做限制的,默认containerd没有开启SystemdCgroup,在systemd初始化的系统上,建议开启;特别注意containerd如果作为k8s集群的容器引擎,这个驱动器需要和kubelet保持一致;否则会出现初始化k8s集群,容器自动重建的现象
启动 containerd 并设置开机自启
1
| systemctl enable --now containerd
|
部署 runc
1
2
3
4
5
| wget https://github.com/opencontainers/runc/releases/download/v1.1.5/runc.amd64
chmod a+x runc.amd64
mv runc.amd64 /usr/bin/runc
|
下载测试镜像并验证
 1
 2
 3
 4
 5
 6
 7
 8
 9
10
11
12
13
| root@k8s-node03:~# ctr imgs pull docker.io/library/alpine:latest
docker.io/library/alpine:latest: resolved |++++++++++++++++++++++++++++++++++++++|
index-sha256:124c7d2707904eea7431fffe91522a01e5a861a624ee31d03372cc1d138a3126: done |++++++++++++++++++++++++++++++++++++++|
manifest-sha256:b6ca290b6b4cdcca5b3db3ffa338ee0285c11744b4a6abaa9627746ee3291d8d: done |++++++++++++++++++++++++++++++++++++++|
layer-sha256:f56be85fc22e46face30e2c3de3f7fe7c15f8fd7c4e5add29d7f64b87abdaa09: done |++++++++++++++++++++++++++++++++++++++|
config-sha256:9ed4aefc74f6792b5a804d1d146fe4b4a2299147b0f50eaf2b08435d7b38c27e: done |++++++++++++++++++++++++++++++++++++++|
elapsed: 11.3s total: 2.0 Mi (181.5 KiB/s)
unpacking linux/amd64 sha256:124c7d2707904eea7431fffe91522a01e5a861a624ee31d03372cc1d138a3126...
done: 121.740597ms
root@k8s-node03:~# ctr imgs ls
REF TYPE DIGEST SIZE PLATFORMS LABELS
docker.io/library/alpine:latest application/vnd.docker.distribution.manifest.list.v2+json sha256:124c7d2707904eea7431fffe91522a01e5a861a624ee31d03372cc1d138a3126 3.2 MiB linux/386,linux/amd64,linux/arm/v6,linux/arm/v7,linux/arm64/v8,linux/ppc64le,linux/s390x -
|
ctr 客户端创建测试容器
 1
 2
 3
 4
 5
 6
 7
 8
 9
10
11
12
13
14
15
16
17
18
19
20
21
22
23
24
| root@k8s-node03:~# ctr run -t --net-host docker.io/library/alpine:latest test sh
/ # ifconfig
ens33 Link encap:Ethernet HWaddr 00:0C:29:EB:68:C7
inet addr:192.168.0.76 Bcast:192.168.0.255 Mask:255.255.255.0
inet6 addr: fe80::20c:29ff:feeb:68c7/64 Scope:Link
UP BROADCAST RUNNING MULTICAST MTU:1500 Metric:1
RX packets:150682 errors:0 dropped:98 overruns:0 frame:0
TX packets:47714 errors:0 dropped:0 overruns:0 carrier:0
collisions:0 txqueuelen:1000
RX bytes:204871097 (195.3 MiB) TX bytes:3518180 (3.3 MiB)
lo Link encap:Local Loopback
inet addr:127.0.0.1 Mask:255.0.0.0
inet6 addr: ::1/128 Scope:Host
UP LOOPBACK RUNNING MTU:65536 Metric:1
RX packets:233 errors:0 dropped:0 overruns:0 frame:0
TX packets:233 errors:0 dropped:0 overruns:0 carrier:0
collisions:0 txqueuelen:1000
RX bytes:20170 (19.6 KiB) TX bytes:20170 (19.6 KiB)
/ # exit
root@k8s-node03:~# ctr containers ls
CONTAINER IMAGE RUNTIME
test docker.io/library/alpine:latest io.containerd.runc.v2
|
提示:默认我们不指定名称空间对应容器都运行在default名称空间下;我们可以使用 -n 选项来指定对应名称空间信息
二、containerd 客户端工具
2.1 crictl 客户端工具部署
1
2
3
| wget https://github.com/kubernetes-sigs/cri-tools/releases/download/v1.26.1/crictl-v1.26.1-linux-amd64.tar.gz
tar xf crictl-v1.26.1-linux-amd64.tar.gz -C /usr/local/bin/
|
2.2 查看 crictl 默认配置文件路径
1
2
3
| root@k8s-node03:~# crictl --help |grep config
config Get and set crictl client configuration options
--config value, -c value Location of the client config file. If not specified and the default does not exist, the program's directory is searched as well (default: "/etc/crictl.yaml") [$CRI_CONFIG_FILE]
|
2.3 查看 containerd sock 文件路径
1
2
| root@k8s-node03:~# cat /etc/containerd/config.toml |grep sock
address = "/run/containerd/containerd.sock"
|
2.4 配置 crictl 运行时环境
1
2
3
4
5
| root@k8s-node03:~# cat /etc/crictl.yaml
runtime-endpoint: "unix:///run/containerd/containerd.sock"
image-endpoint: "unix:///run/containerd/containerd.sock"
timeout: 10
debug: false
|
2.5 测试验证下载镜像
1
2
3
4
5
| root@k8s-node03:~# crictl pull nginx:1.20.2
Image is up to date for sha256:50fe74b50e0d0258922495297efbb9ebc3cbd5742103df1ca54dc21c07d24575
root@k8s-node03:~# crictl imgs
IMAGE TAG IMAGE ID SIZE
docker.io/library/nginx 1.20.2 50fe74b50e0d0 56.7MB
|
三、nerdctl 客户端工具
3.1 下载安装
1
2
3
| wget https://github.com/containerd/nerdctl/releases/download/v1.3.0/nerdctl-1.3.0-linux-amd64.tar.gz
tar xf nerdctl-1.3.0-linux-amd64.tar.gz -C /usr/local/bin/
|
提示:nerdctl工具和crictl一样,默认不指定名称空间就是default名称空间
为 nerdctl 提供一个配置文件来指定默认名称空间
1
2
3
4
5
| root@k8s-node03:~# cat /etc/nerdctl/nerdctl.toml
namespace = "k8s.io"
debug = false
debug_full = false
insecure_registry = true
|
测试:不指定命名空间,看对应配置是否生效
1
2
3
4
5
| root@k8s-node03:~# nerdctl imgs
REPOSITORY TAG IMAGE ID CREATED PLATFORM SIZE BLOB SIZE
nginx 1.20.2 03f3cb0afb7b 12 minutes ago linux/amd64 149.1 MiB 54.1 MiB
nginx <none> 03f3cb0afb7b 12 minutes ago linux/amd64 149.1 MiB 54.1 MiB
<none> <none> 03f3cb0afb7b 12 minutes ago linux/amd64 149.1 MiB 54.1 MiB
|
提示:可以看到现在我们不指定名称空间,对应就是显示k8s.io名称空间下镜像;说明我们给的配置生效了
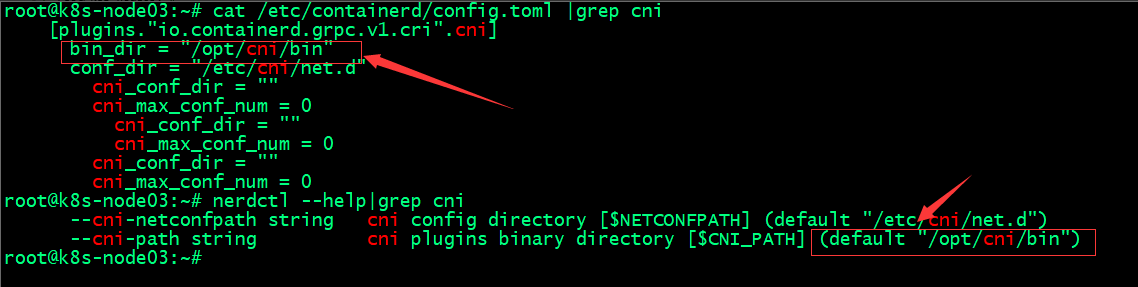
查看containerd cni插件目录和nerdctl cni插件位置
四、安装 CNI
1
2
3
4
5
| wget https://github.com/containernetworking/plugins/releases/download/v1.2.0/cni-plugins-linux-amd64-v1.2.0.tgz
mkdir -p /opt/cni/bin
tar xf cni-plugins-linux-amd64-v1.2.0.tgz -C /opt/cni/bin/
|
提示:nerdctl 在创建容器时,它依赖 cni 插件来给容器创建网络
测试:创建 nginx 容器
 1
 2
 3
 4
 5
 6
 7
 8
 9
10
11
12
13
14
| root@k8s-node03:~# nerdctl imgs
REPOSITORY TAG IMAGE ID CREATED PLATFORM SIZE BLOB SIZE
nginx 1.20.2 03f3cb0afb7b About an hour ago linux/amd64 149.1 MiB 54.1 MiB
nginx latest 2ab30d6ac535 50 minutes ago linux/amd64 149.7 MiB 54.4 MiB
nginx <none> 03f3cb0afb7b About an hour ago linux/amd64 149.1 MiB 54.1 MiB
<none> <none> 2ab30d6ac535 50 minutes ago linux/amd64 149.7 MiB 54.4 MiB
<none> <none> 03f3cb0afb7b About an hour ago linux/amd64 149.1 MiB 54.1 MiB
root@k8s-node03:~# nerdctl run -d -p 80:80 nginx
FATA[0000] failed to create shim task: OCI runtime create failed: runc create failed: unable to start container process: error during container init: error running hook #0: error running hook: exit status 1, stdout: , stderr: time="2023-04-09T16:11:40Z" level=fatal msg="failed to call cni.Setup: plugin type=\"bridge\" failed (add): failed to locate iptables: exec: \"iptables\": executable file not found in $PATH"
Failed to write to log, write /var/lib/nerdctl/1935db59/containers/k8s.io/bf9d980bbed0d28778a3e0f21ad380df1b712841b6887792ce1fa0f483bf9a7d/oci-hook.createRuntime.log: file already closed: unknown
root@k8s-node03:~# nerdctl ps -a
CONTAINER ID IMAGE COMMAND CREATED STATUS PORTS NAMES
bf9d980bbed0 docker.io/library/nginx:latest "/docker-entrypoint.…" 6 seconds ago Created 0.0.0.0:80->80/tcp nginx-bf9d9
root@k8s-node03:~#
|
提示:这里容器虽然创建了没有运行,给我们报了一个错,意思就是在path环境变量中没有找到iptables,无法执行iptables命令;解决办法就是安装iptables工具(我这里是最小化安装的ubuntu2204的版本,好多命令都没有)
安装 iptables 工具
1
| apt-get install iptables -y
|
再次运行容器,看对应的容器是否能正常运行
1
2
3
4
5
6
7
| root@k8s-node03:~# nerdctl run -d -p 80:80 nginx
f3c40d58c1b98e90ef37da97b7fa6f5b8e9f44e7e40ba973678d53fef79b723f
root@k8s-node03:~# nerdctl ps -a
CONTAINER ID IMAGE COMMAND CREATED STATUS PORTS NAMES
bf9d980bbed0 docker.io/library/nginx:latest "/docker-entrypoint.…" 57 seconds ago Created 0.0.0.0:80->80/tcp nginx-bf9d9
f3c40d58c1b9 docker.io/library/nginx:latest "/docker-entrypoint.…" 3 seconds ago Up 0.0.0.0:80->80/tcp nginx-f3c40
root@k8s-node03:~#
|
提示:安装了 iptables 工具后,再次运行容器,对应容器就跑起来了
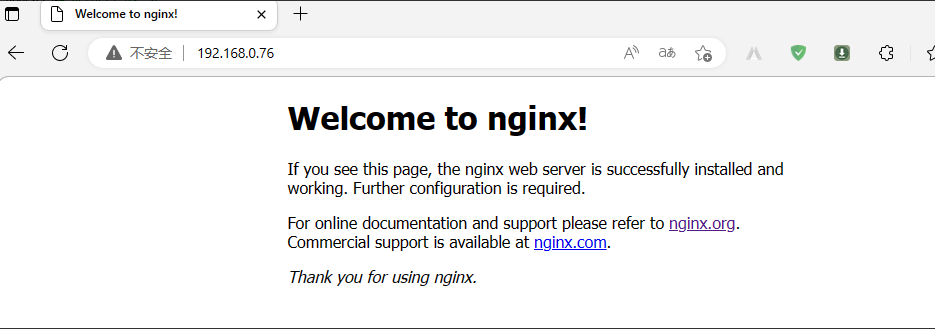
验证:访问对应 nginx 是否可以正常访问
基于ubuntu2204部署containerd和客户端工具的测试就到此为止;推荐使用nerdctl客户端工具,这个工具的命令和docker非常相似,熟悉docker命令的使用,nerdctl也就不难使用了